‏إظهار الرسائل ذات التسميات Service. إظهار كافة الرسائل

الأحد، 16 أغسطس 2015

How to Fix "Unfortunately, Camera Not Found" On ASUS Zenfone


However, it seems that there are some problems that come along with root access as different and numerous users reported important bugs on their Zenfone. One of these issues refers to the camera, as after gaining root access the following alert is being displayed on the Asus Zenfone 2 and Zenfone 5: “No camera is Found”. Well, if you experiencing this bug too, don’t hesitate and follow the troubleshoot from Asus Zenfone Blog below. DWYOR (Do it With Your Own Risks)

How to Fix "No camera is Found" on ASUS Zenfone 5:

  1. Download Fix File (Here)
  2. Download Zenfone 5 Firmware (Here)
  3. Download ADB Tools (Here)
  4. Extract ADB Tools and Place extracted fix file and Firmware to ADB Tools Folder
  5. Turn Off Zenfone 5 and Enter Fastboot/droidboot Mode (Press Power + Volume up at the same time until droidboot apear)
  6. Connect to PC/Laptop
  7. Open ADB Folder, Press Shift + Right Click > Open Command Here 
  8. At CMD Type adb devices (then press enter) and see your device is connected or not, if it shows your device you can proceed to step 9. If doesn't show try another port or make sure you place at adb folder.
  9. Type this following commands (Press enter after each line) :
  10. fastboot flash fastboot fastboot.img
    fastboot flash boot boot.img
    fastboot flash recovery recovery.img
  11. On Fastboot mode now choose "Recovery"
  12. Choose "Wipe Data" then "Wipe Cache"
  13. Select "update from adb"
  14. at cmd type this command and press enter:
  15. adb sideload UL-ASUS_T00F-WW-2.21.40.30-user.zip
  16. Reboot
  17. Done

How to Fix "No camera is Found" on ASUS Zenfone 2:

  1. On your computer open your web browser app. Then navigate here and download the root exploit.
  2. Place the file on desktop and unzip it on your computer.
  3. Connect your Asus Zenfone 2 with your computer by using your phone’s USB cable.
  4. Now, access the root exploit folder from your computer and from there open a command prompt window: press and hold Shift keyboard key while right clicking on any blank space.
  5. Reboot your smartphone into fastboot mode by entering in the cmd window: adb reboot bootloader.
  6. Next, type the following commands – press enter after each line:
  7. fastboot flash fastboot files/root/fastboot.img
    fastboot reboot bootloader
  8. Wait a few moments and then execute the following commands one by one – the bootloader will be unlocked:
  9. fastboot flash dnx files/vanilla/dnx_fwr_ctp_a500cg.bin
    fastboot flash ifwi files/root/ifwi_ctp_a500cg.bin
    fastboot reboot-bootloader
  10. After doing so you can root your Zenfone 2 by entering in the same cmd window:
  11. fastboot flash recovery files/root/recovery.img
    fastboot flash update files/root/dummy.zip
    adb reboot bootloader
  12. In the end, make sure that the “Camera not found” bug is addressed by entering these commands:
  13. fastboot flash fastboot files/vanilla/fastboot.img
    fastboot flash recovery files/vanilla/recovery.img
    fastboot flash dnx files/vanilla/dnx_fwr_ctp_a500cg.bin
    fastboot flash ifwi files/vanilla/ifwi_ctp_a500cg.bin
    fastboot reboot
  14. That’s it; unplug the USB cable and enjoy.

    الخميس، 9 يوليو 2015

    ASUS Zenfone 2 Running Windows 7


    Windows 7 Installation Achieved on Asus Zenfone 2
    Android as a platform has always been about its open source nature and the freedom it provides to the end user. From simple modifications like icon packs to more extreme ones like the MultiROM project, each passing day sees the community produce something new, something wonderful that further enforces the platform’s openness.

    In what can only be deemed a project deep into the extreme end of the modding spectrum, XDA Senior Member ycavan took to the forums earlier today to show off a full-blown Windows 7 installation running on his Intel-powered Zenfone 2. The nature of the Intel Atom’s architecture ensures that the OS runs at near native speeds, and despite the installation
    procedure being relatively complex, the end almost justifies the means for enthusiasts longing for a desktop OS on a handheld device. In his post, ycavan outlines every step required for the installation, the gist of which is that interested Zenfone 2 users must unlock their bootloader, flash a specific kernel, partition their SD card and run a host of terminal commands, upon completion of which, the Windows installation will begin in a virtual machine.


    الجمعة، 19 يونيو 2015

    ASUS Zenfone 2 Unlock Bootloader


    All Credit to Shakalaca, original post XDA

    What is a bootloader? At its most basic level, your Android smartphone is like a hard drive, made of up several partitions. One of those partitions holds the Android system files, another holds all the app data you accumulate (which is how you're usually able to update without losing all your stuff), and others to do more behind-the scenes stuff.

    Think of the bootloader as a security checkpoint for all those partitions. Because if you're able to swap out what's on those partitions, you're able to break things if you don't know what you're doing. Or, with a little hackery, you're able to run custom ROMs.


    Notes:

    1. Work for ZE551ML (Z00A) and ZE550ML (Z008)
    2. Update firmware first to 2.19.40.12(ZE550ML) and 2.19.40.18 (ZE551ML)
    3. Make sure ADB Working properly

    How to Unlock Zenfone 2 Bootloader: 

    1. Root your Zenfone 2 (Root) 
    2. Make sure ADB is Working (Download Here if you don't have it)
    3. Connect Zenfone 2 to PC and open cmd at ADB path
    4. at Command Prompt Type (press enter after type each line):
    5. adb shell
      su
      getprop ro.isn > /factory/asuskey
      reboot bootloader
    6. Phone will restart in recovery, after updating itself phone will restart and ASUS splash screen will be white.
    7. Download Black Splash screen (Download)
    8. navigate to adb folder opened cmd and type the following command:

    9. adb reboot bootloader (pressed enter)
      fastboot devices (pressed enter)

      see if device is listed, write following

      fastboot flash splashscreen splashscreen.img (pressed enter)
      restart your phone and Now black splash screen is back. Congrats your bootloader is now unlocked
    10. Done
    PS:  you can not re-lock your bootloader again for now
    Thanks again to Shakalaca

      الأربعاء، 27 مايو 2015

      How to Root ASUS Zenfone 4 Lollipop (Android 5.0)


      DWYOR


      Files to Download :

      1.  Intel USB Driver (Download)
      2.  CWM by X-Team (Download)
      3.  SuperSU (Download)

      Instructions :

      1. Download Files above and Install intel usb driver (if you don't have it)
      2. Extract CWM to folder
      3. Copy SuperSU to Zenfone 4 SDCard
      4. Turn off Zenfone 4
      5. Go to Droidboot (Power+Volume up)
      6. Connect Zenfone 4 to PC
      7. At CWM Folder open cmd (Shift+Right Click > Open Command Here)
      8. See device connected properly or not by typing: adb devices if the device listed proceed to next step.
      9. Flash cwm, type at cmd: fastboot flash update update.zip
      10. Enter CWM choose update from sdcard
      11. choose supersu and flash it
      12. wait until finish
      13. reboot and device rooted
      DWYOR( Do it With Your Own Risks)
      Thanks to:
      X-Team ->CWM
      chainfire->SuperSU


      How to fix Zenfone 5 "no sound" when calling after update 2.22.40.53

      this annoying trouble caused by Zenfone 5 latest system update 2.22.40.53. ASUS team are actively working for fix. for temporary way you can follow this step to fix this issue:
      1. Turn on Dial pad touch tones (settings>sound) if doesnt work,
      2. When accept incoming call press "hold" button once (upper right of 9 buttons)  
      3. Then immediatelly press it again, and then you can successfully talk on your phone

      This issue only happens on the incoming call

      الأحد، 24 مايو 2015

      How to Change Zenfone 2 Firmware from CN/TW to WW


      Today ASUS Zenfone Blog will teach you How to Change Zenfone 2 Firmware from TW/CN to WW. Asus Zenfone 2 firmware divided by three region CN for China, TW for Taiwan and WW for Worldwide/Global. By changing SKU/Firmware from your original SKU/firmware can make your Zenfone 2 will not able to  get OTA firmware, but you can do it Manually via ADB Sideload / SD Card update.

      DWYOR (Do it With Your Own Risks)

      Files to Download:

      1. Asus Zenfone 2 Recovery Images ZE550ML=Z008, ZE551ML=Z00A (DOWNLOAD)
      2. Asus Zenfone 2 Firmware (Download for ZE550ML, Download For ZE551ML)-> Choose Android then Firmware and choose WW version
      3. Intel USB Driver (Download)
      4. ADB (Download)


      Instructions:

      1. Download all files above (Note: choose same recovery and firmware ex: download Z00A 2.17.40.12  and download 2.17.40.12 firmware)
      2. Install Intel USB Driver
      3. Open Downloaded ADB then extract it
      4. Place recovery, firmware to ADB Folder
      5. Enable USB Debugging (Settings>About>Software Information>Tap Build Number 7 times then in settings developer option menu tick usb debugging)
      6. Connect Zenfone 2 with PC/Laptop
      7. in ADB Folder press shift+right click > open command here
      8. Check Zenfone 2 connected properly or not (Type in cmd: adb devices) "press allow and remember your choice" on zenfone 2 screen
      9. You will see your Zenfone 2 on cmd list
      10. Type in cmd: adb reboot bootloader
      11. Zenfone 2 will reboot to bootloader
      12. Type This at CMD:
        fastboot flash recovery recovery.img
        fastboot flash boot boot.img
        fastboot flash fastboot droidboot.img
      13. Reboot Phone
      14. Copy Zenfone 2 firmware to Phone Storage and wait for notification and wait until finish or you can flash via ADB Sideload

      الأحد، 17 مايو 2015

      ASUS Zenfone 2 Disassembly


      If you’re excited about the new ASUS Zenfone 2, we’re with you. A brilliant screen, backed by world class specs — it’s easily one of the best this year.

      Like any hotly anticipated phone, someone was bound to take it apart. This time, we turn to Zentalk Taiwan forum for our teardown needs.

      As you can see from the pics below, the ASUS Zenfone 2 isn’t easily disassembled. More to the point, don’t try this at home.


      Motherboard Parts List :

      1) Intel P10 PMB9933 C XG726G H1450 F450A513 (Baseband, XMM 7260)
      2) BROADCOM BCM4339XKUBG (WiFi)
      3) Intel P10 H1448 F4486902 PMB6830 (PM IC) 

      4) SK hynix H9CKNNNCPTMR PRNUH 501A 
      5) Winbond W978H6KBVX2E 6) SKY77597-11 ( TxRx FEM)

      1) SanDisk SDIN8DE4-32G (eMMC)
      2) Intel 8818 2.3W XG223 H1502 F502A511
      3) Qualcomm SMB1357 (fast charge?!)
      4) Intel P10 H1428 F4288509 PMB5747
      5)?
      6) SKY77627-11 (PAM)
      7)?

      How to Downgrade ASUS Zenfone 5 LTE A500KL Lollipop (Android 5.0) to Kitkat (4.4)


      Asus already gave an update Android 5.0 Lollipop For ASUS Zenfone 5 LTE A500KL or Asus Zenfone 5 LTE. Today Asus Zenfone Blog will teach you How to Downgrade ASUS Zenfone 5 LTE A500KL from Android 5.0 Lollipop to KitKat 4.4.

      Notes:

      1. This method will downgrade Android 5.0 (Lollipop) to Android 4.4 (KitKat) TW_11.4.6.94 or WW_11.4.6.94; software can not be converted back into the other version version.
      2. The system version will revert back to the board to default values ​​and cause data loss; you need to take to back up important data before back version. 
      3. Make sure Zenfone Battery above 20% 
      4. Please go to [Settings] -> [storage space], and select the USB connection mode to " media device (MTP) . "


      Procedure:
      1. Please go to the following URL to download descending brush tool:http://www.asus.com/tw/Phones/ZenFone_5_A500KL/HelpDesk_Download/
      2. Select Android
      3. Choose Firmware


      4. Download file ( TW_A500KL_11_4_6_94.zip for TW version and WW_A500KL_11_4_6_94.zip for WW version) decompression, rename​​the following file " TW_A500KL-11.4.6.94-20141218_M3.5.22-ota-user.zip " or " WW_A500KL-11.4.6.94-20141218_M3.5.22-ota-user.zip "
      5. Connect your phone and computer using Micro USB, and copy TW_A500KL-11.4.6.94-20141218_M3.5.22-ota-user.zip/WW_A500KL-11.4.6.94-20141218_M3.5.22-ota-user.zip to the root directory of the phone's internal storage space.
      6. Turn the phone off, then hold down the "power button" and "volume down key" hold to enter Recovery Mode.  
      7. see the following screen, press the volume keys to select " 1. Enter SD download mode ", then press the power button to perform to confirm the action. 
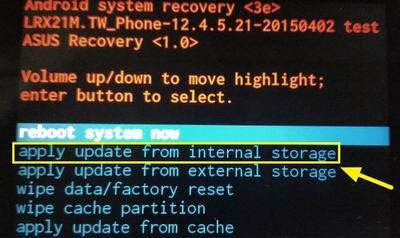
      8. Press the Volume button to select " Apply Update from Internal Storage ", then press the power button to confirm.
      9. Press the Volume button to select " 0 / "and then press the power button to confirm.
      10. Press the volume keys to select " TW_A500KL-11.4.6.94-20141218_M3.5.22-ota-user.zip " / WW_A500KL-11.4.6.94-20141218_M3.5.22-ota-user.zip , then press the power button to confirm.  
      11. After the update is complete, press the volume button to select " Wipe Data / Factory RESET ", then press the power button to confirm.  
      12. Press the volume keys to select " Yes - delete user All Data ", then press the power button to confirm.  
      13. press the volume keys to select " reboot system now ", and then press the power button to confirm.  
      14. Downgrade version is complete, up to [Settings] -> [about] -> [Software Information] to check the version number is a V11.4.6.94 .

      الثلاثاء، 12 مايو 2015

      [Zenfone 2] Install Android 5.0 Xposed Framework


      Since official for 5.x version only for ARM platforms, so younger self synchronous android-ia part of the source code and shakalaca change program a little , compile a copy to ZenFone 2 used Xposed Framework.

      Download Xposed Framework For ASUS Zenfone 2 

      https://mega.co.nz/#!dsUgzZTb!oYF9XwgeEPkfw6mQ9CHxUk1HbExrdq4aeSFaW_CNJH8
      Old Version

      New Version, v2.20.40.156 up

      Enable USB Debugging>Connect Zenfone 2 to PC/Laptop>Double Click Install.bat (or install.sh) to install. 
      pay attention to the official or alpha version, so there will freeze bug will crash phenomenon is very reasonable

      DWYOR

      Source


      الخميس، 30 أبريل 2015

      How To Downgrade From Lollipop Beta to Kitkat


      Today Asus Zenfone Blog post tutorial How to Downgrade from Android 5.0 Lollipop Beta to Kitkat 4.4.2. Couple days ago Asus Zenfone Blog Posted ROM Lollipop Beta for Asus Zenfone 5,  If you not satisfied with the performance or want to back to KitKat This Tutorial will help you. DWYOR and Backup your data first because this tutorial will erase all your data.

      Files to Download:

      1. Asus Zenfone 5 4.4.2 System img (Download Here/MIRROR)
      2. Boot.img recovery.img fastboot.img (Download Here)

      Instructions:

      1. Download Files Above and Extract 
      2. Activate USB Debugging (Go to Developer Options>USB Debugging)
      3. Connect Zenfone 5 Lollipop to PC/Laptop
      4. Open WW Folder and Open CMD (Shift+Right Click > Open Command Here)
      5. Check if your Zenfone Connected or Not. Type: ADB devices and you will see your device connected or not (Don't forget to click authorize on Zenfone 5 screen)
      6. Now Reboot to Bootloader by Typing: adb reboot bootloader
      7. After Entering bootloader then flash boot.img, fastboot.img, and recovery.img. type: fastboot flash boot boot.img then wait until finished type: fastboot flash recovery recovery.img then wait until finished, type: fastboot flash fastboot fastboot.img
      8. Go to System Image Folder and Open CMD (Shift+Right Click>Open Command Here)
      9. Type: fastboot flash system system.img and wait until compete

      10. Go to Droidboot and Choose Factory Reset
      11. Reboot and Your Zenfone will be back to KitKat

      الثلاثاء، 28 أبريل 2015

      How to Enter Asus Zenfone Lollipop Recovery


      What is recovery?  In Android, recovery refers to the dedicated, bootable partition that has the recovery console installed.  A combination of key presses (or instructions from a command line) will boot your phone to recovery, where you can find tools to help repair (recover) your installation as well as install official OS updates. 

      Today Asus Zenfone Blog will teach you How to Enter Recovery Mode on ASUS Zenfone 5/6 Lollipop

      Entering Recovery Mode

      1. Turn off your Zenfone
      2. Hold Power button + Volume up
      3. When the phone is vibrating release power button
      4. Then the display change like this:
      5. You can select Normal Boot or recovery Boot by pressing Volume up/volume down. To enter recovery choose recovery mode
      6. Then You will see sleep android robot, Press Power button + Volume up and release the buttons
      7. The you will see Asus Zenfone Lollipop Recovery Mode

      الجمعة، 24 أبريل 2015

      How to Root Zenfone 5 Lollipop


      Download Root-recovery Files:


      How to Root Asus Zenfone 5 (T00F/T00J) Lollipop version (For Kitkat and Jellybean see here)
      1.  Install TWRP/Philz (Tutorial Here)
      2.  place SuperSU-autoroot.zip on /sdcard or /microSD, but I recommend u place on both
      3.  Go to recovery mode:
        on fastboot: choose "recovery", then wait.
        or from power off: hold power+vol down.
      4. ON RECOVERY: choose install, choose where u place SuperSU-autoroot.zip and wait till success.
      5. reboot system

      Video Tutorial:


        TWRP - Philz Recovery Zenfone 5 (Kitkat/Lollipop)


        Download TWRP-Philz AutoInstaller :


        http://adf.ly/1FlzAn

        flashing the TWRP Recovery Zenfone 5 (Work at Kitkat/Lollipop)
        1. Download File Above
        2. Enable USB Debugging (Tutorial Here)
        3. Connect Zenfone 5 With PC/Laptop
        4. Double click TWRPRecovery-install.bat

        flashing the PhilZ Touch Recovery
        Zenfone 5 (Work at Kitkat/Lollipop)
        1. Download File Above
        2. Enable USB Debugging (Tutorial Here)
        3. Connect Zenfone 5 With PC/Laptop
        4. Double click PhilZTouchRecovery-installer.bat

        To Apply OTA Update, you must back to Original Recovery:

        1. Download File Above
        2. Enable USB Debugging (Tutorial Here)
        3. Connect Zenfone 5 With PC/Laptop
        4. Double click lockbootloader-forOTA.bat

        Video Tutorial:


          الخميس، 23 أبريل 2015

          Philz Touch Recovery Zenfone 5 Kitkat


          Instruction for install Philz Touch Recovery


          1. make sure usb debug is enable
          2. plug your phone while open
          3. double click PhilZTouchRecovery-installer.bat and your done you have PhilZ Touch Recovery
          4. Download file
          5. zenfone kitkat auto installer Philz touch recovery -> download

          Be Inform
          if you stock at usb logo after using PhilZ Touch Recovery
          hold power + volume up youneed to go to droidboot and then process to reboot
          this is not for newbie thanks


          Thanks to Zenfone.ph

          الاثنين، 20 أبريل 2015

          [How to fix] Rooted Zenfone 2 Can't Boot After Update


          Today Asus Zenfone Blog will share How to Fix Rooted Zenfone 2 Can't Boot After Update. How to Root Asus Zenfone 2 Can Be Found Here. After using that method to Root My Zenfone 2 yesterday Asus gave Zenfone 2 Update, but after update my Zenfone 2 stuck on bootloop. This tutorial will resolve this problem.

          1. Double wipe your Zenfone 2 (Wipe Cache and Wipe Data, Tutorial Here)
          2. Download your zenfone 2 pre-root system.img Here and Extract it
          3. Flash system.img droidboot.img boot.img and recovery.img using Fastboot command