‏إظهار الرسائل ذات التسميات Android Tutorial. إظهار كافة الرسائل

الخميس، 28 ديسمبر 2017

Give blackberry priv look and feel to your android

Image result for blackberry priv


If you have seen the recent blackberry priv and would love to have that kind of feel for your android,here in this little tutorial, you will learn how to give your android the look and feel of the blackberry priv.

Blackberry priv is the most recent blackberry device and it is fully stocked with android OS. The look and feel of the phone is so exceptional that can make anyone fall for it.
Now, the core applications that give the Blackberry priv such elagant look has been extracted and made available for all android devices..But...but what? Your android has to be 5.0 or higher to use the blackberry priv theming.

Download Links
Blackberry priv laucher(download)
Blackberry priv keyboard(download)
Blackberry priv services and framework
Blackberry calender(download)

Once downloaded, you may proceed to installing them since they are all apk files, and Baam! you now have the feel and look of the blackberry priv,

Restore Mobile Network Lost On Android Phones: How To

Just like Apple  iPhone 3G, 3GS and 4.What happens to the listed phones is that, when you buy it from another country, and it is locked to another carrier, you will not be able to use it with your local network, you will either need to do a factory unlock on it, or simply unlock it through jailbreak with ultrasnow, snowbreeze evasion etc… if you do none of the above, you won’t be able to use your iPhone with any other carrier other than the one it is locked to.
network fix for android

Similar event is happening to some android phones, especially Samsung galaxy s3. Could you believe i bought, a Samsung galaxy s3 GT-i9300 which is a global variant, that is not locked to any carrier whatsoever. It came with the annoying ICS and i try and upgrade this to Android 4.1.2 official jellybean. The upgrade process went very smoothly but when i reboot my phone, Alas, i got no servicee, meaning i cannot make call, i can’t use Bluetooth, i can’t use wifi. In short, i cannot use anything related to connectivity. I downgraded this phone, but still, no luck i was so frustrated until i found a solution which solved 70% of my problem. I was able to restore mobile network, and partially restore WiFi, However i couldn’t use my Bluetooth. I was so happy that at least i can use my phone for what is primarily meant for. Let me share with you how i did this;
Disclaimer & Warning!

     It is strongly advised that  you use this tutorial only for Samsung Galaxy s3 Although i used it successfully on a friend’s HTC, But you use it on other android phones at your own risk. Trying using this tutorial  in any other Android device May result in unpleasant outcomes of which am not liable.So before you proceed,  Check your device’s model number in: Settings » About phone. Try this at your own risk. Although, it is very unlikely that your device will be damaged if you follow all the instructions here to the last letter in this tutorial

Important Pre-Requisites

STEPS TO RESTORING YOUR LOST MOBILE NETWORK:
  1. Root your phone
  2. Install busybox (busybox pro recommended because it comes handy with the full installer)
  3. Install and Launch ARIZAPatch and select the offline patch mode.. It will verify that your phone has been rooted and busbox properly installed.
  4. That is all, after reboot, your phone will rediscover its lost cellular network. Like i said earlier, you can try this on other android phones having similar problems. But do this at your own risk.
Read also: How to slove NVRAM and wifi Error in Androids
NEED FURTHER ASSISTANCE? Whatsapp:08106847913. BBM:5C099290

How To Flash CMW Recovery On Gionee P2

 Image result for gionee p2
If you’ve ever thought about messing with your Android device, you’ve probably read that you need to flash a custom recovery onto it before you can do anything serious. But, you might want to ask a few questions like — what’s a recovery? What’s a custom recovery? What are my options for custom recoveries? We’re going to take a complete look at recoveries so that you can be well-informed when you start messing with your Android device.

What’s a Recovery?


The recovery, simply put, is a runtime environment (think “mini operating system”) separate from Android that can perform various system-related tasks. The stock recovery on most Android devices can apply OTA (over-the-air) updates, delete user and cache content (for factory reset purposes), and allow external tools from a microSD card to run functions on the device.
Compared to a full-sized PC, it is most similar to the BIOS in that it is a small piece of software that is independent of the operating system and can control various system settings and functions, but it does not actually perform the same exact tasks. For example, the recovery doesn’t control any I/O functions, which is entirely what the BIOS is about. The recovery also has no power as soon as Android is being loaded.

And a Custom Recovery?

cwm3_screenshot
A custom recovery is a non-stock recovery, which people can install over the stock recovery. There are many different reasons why someone will want to install a custom recovery — most of those reasons are extra functionality. Most of the major features include:
  • The ability for third-party ROMs to be installed over the stock Android image
  • The ability to perform Nandroid backups — these are very good backups that saves literally everything from your personal data to the operating system itself
  • The ability to communicate with the Android Debug Bridge, or adb, on a computer for debugging and other developer-type actions, which is otherwise only possible when enabling developer tools within Android
  • A more useful and/or visually-pleasing interface for the recovery, which can include touch capabilities or an interface not driven by menu options.
Long story short, custom recoveries allow you to do various things that the manufacturer may not want you to do with it. They make the stock recovery so limited for the sake of making sure that you don’t turn your device into a brick, but you know what you’re doing, right?
 #CMW Recovery for Gionee P2.....Download it here

After you download it put it on root of sdcard.
Install Mobileuncle MTK Tools from link here:
https://play.google.com/store/apps/details?id=com.mobileuncle.toolbox
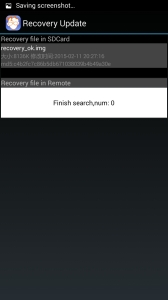
Enter into MobileUncle Tools and Click on “Recovery update“.
Screenshot_2015-02-22-10-19-39-198
Now choose recovery image you download earlier (in this case recovery_ok.img, use either CWM or TWRP).
Screenshot_2015-02-22-10-19-45-317
Choose OK after dialog “Are sure flash recovery!”.
Screenshot_2015-02-22-10-20-00-483
Reboot directly into recovery if you wish.
Screenshot_2015-02-22-10-20-06-555
That’s all!
If you want to enter recovery from power off do this:
  1. Turn off the phone, uncheck quick boot mode.
  2. Press Volume +, Volume – and Power, all three at the same time and hold them until you see recovery screen.
 
     Click here to SUBSCRIBE to this Blog to Receive future updates..

    Get MIUI 7 for INFINIX HOT 507- 100% Sucessfully Ported and Bugless

    After very many, many hours trying to perfect this ROM and clean out all bugs, I am proud to present to you MIUI 7 [5.9.17 – latest] for the Infinix X507. This particular one, has not been easy but I finally made it.


    MIUI is still on Android KitKat OS so this is for those of you yet to upgrade to the lollipop firmware or you just love MIUI so much, like I do, enough to want to go back to KitKat for it.

    I will present you with download link for the ROM. The download is a RAR file which in it, contains the ROM in zip form, the recovery you will be using, [PhilZ Recovery] [You can flash the recovery using either MTK Mobile Uncle Tools or SP Flash Tool, whichever you prefer] and a folder containing Next Launcher and the theme I am using just in case any of you want to use my exact theme. Both my Next Launcher and theme are Premium already paid for apps so you need not worry about ads and the likes.


    I repeat, the ROM is bug free but if you encounter any bug, please let me know and I will work at fixing it ASAP.


    1. Both SIM Cards working and both have 3G

    2. Camera in perfect condition.

    3. Battery life optimum.

    4. No lags whatsoever.

    5. Fully deodexed.

    6. RAM usage low.

    7. Playstore working [plus it comes with MIUI’s App Store]

    8. SIM Toolkit working for both SIMs


    How To Install

    - Download the ROM from the following link MIUI_v7_5.9.17_Infinix_X507

    1. Make a backup of your contacts to a vCard and have it somewhere external like your sdcard or pc.

    You will import the vCard after you are done. You can use this app Contacts VCF.

    2. Copy the downloaded files to your sdcard

    3. Flash the recovery provided with the file. [You might get errors if you try to flash it with CWM or TWRP]

    4. Boot into your recovery

    5. Go to Backup and Restore and hit Backup to /sdcard

    6. Go back and into Wipe and Format Options, scroll down to Clean to Install a New ROM and select that

    7. When it’s done, select Install Zip and then choose zip and you can flash the zip you placed in your sdcard.

    8. After it’s done and tells you script was successful, go back and go into Wipe and Format Options again but this time, select Wipe Cache

    After that's done, select Wipe Dalvik/ART Cache

    9. Reboot your Infinix HOT.


    CONGRATULATIONS: You are now running the latest MIUI on your INFINIX HOT!


    NOTE: This is a ported ROM hence is unofficial. If you ever get a notification for an update, DON'T USE THE OTA update. It will get you Redmi Note 3G’s ROM [which is the base ROM of this port] and that will brick your phone if you do.

    Again, if you encounter any problems or have any questions, don't hesitate to ask.
    Click here to SUBSCRIBE to this Blog to Receive future updates..


    الأربعاء، 27 ديسمبر 2017

    Method to Root New Infinix Zero 3 X552

    The much awaited Infinix Zero 3 is now available for sale!. The Infinix Zero 3 was launched late last year and it comes with amazing features, it looks like a pretty great device. Zero 3 body-design is immense classic and premium, it comes with a dual-sided explosion-proof glass and stainless steel frame. The front is found to come with glossy piano paint while the back features meticulously brushed metal.  

    If you are in need of Infinix Zero 3 X552, it's now available for grab in Jumia Stock with the price of N53,000, rush in and get yours before it out of their stock.
    Grab it with the Buy Now button Below


    Buy from Jumia
    N53,000
    Infinix Zero 3 X552 16GB - Anthracite Grey 

    Below is the rooting method waiting for your Infinix Zero 3 and I'm pretty sure that you will like to root it probably because you will like to enjoy your phone to the fullest.


    Materials Needed For Rooting
    » PC with internet connection
    » USB Cable
    » SP Flash Tool - Download it Here
    » SuperSU.zip - Download it Here 
    » Download Ported TWRP by Team Hovatek For Infinix Zero 3 X552 - Download it Here

    To Root Infinix Zero 3 X552 
    » Save the SuperSU.zip that you downloaded to your phone's SD card
    » Unzip the TWRP for Infinix Zero 3 .zip file that you downloaded and flash the recovery image to the phone using SP Flash Tool
    How Can I Flash it Using SP Flashtool? Check out this link for the instruction: www.shoutamloud/2015/09/how-to-flash...

    » Now, boot your phone into TWRP Recovery Mode (by Holding the Vol Up and Power button simultaneously for 5 seconds)
    » In TWRP Recovery, Choose install zip from SD card - to choose a zip from SD card use Vol up and down scroll up and down, then choose the Supersu.zip file from the root of your SD card.
    Scroll to yes and install, after a successful flashing go back and reboot.

    It is simple as that. You may download Root Checker from Play Store to verify your root privileges. After downloading, simply Install Root Checker, run it and you should get a success message after then.

    Important Notice
    After rooting your phone, it’s advisable to unroot before performing an OTA update or restoring factoring settings.
    Also note that this is the available method for it now, we will update you as soon as we get another simple method. 

    All Credit goes to Team Hovatek.

    الثلاثاء، 26 ديسمبر 2017

    Best Way to Run Android App on PC

    Great News guys! You can run and play any android app on your pc, no need of android smartphone, with bluestacks you can chat, play game and even download apps from playstore using your pc.

    BlueStacks is currently the best way to run Android apps on Windows. It doesn’t replace your entire operating system. Instead, it runs Android apps within a window on your Windows desktop. This allows you to use Android apps just like any other program. BlueStacks also includes support for easy installation of apps from Google Play.
    What you can do with bluestacks app
    1.Run WhatsApp Messenger, Facebook app and other social media apps
    2. Download and Install apps from Playstore
    3.Play Android Games e.t.c
    Where To Get the app
    Click HERE to download Bluestacks for free
    How To Install Bluestacks app
    Click the download setup to install it
    After installation click the start bluestacks icon to download bluestacks game data
    After successful downloading it will start initializing
    Congratulation your bluestacks app is now ready to run Android app on pc
    You can add your google account on it
    You can download and install your favorite android apps and run then
    You can Play your favorite games
    Run Whatsapp messenger and chat with your friends

    You can now enjoy Android apps on pc without your smartphone
     

    How to scan QR codes with an Android phone

    What are QR codes anyway?

    Cynics would say that QR is short for “Quite Rubbish”, but it’s really an acronym for Quick Response Code. It’s a smarter version of the ubiquitous barcode, and it was originally developed in Japan for the automotive industry. Machines can read QR codes more quickly than barcodes, and QR codes can store more data in less space too.
    If QR codes had stayed inside factories we probably wouldn’t care, but of course they’re used for all kinds of things now: coffee shop loyalty programs, e-tickets for sports and concerts, “find out more” links on adverts or on product packaging, or for sharing contact information.
    For most of us, the main reason to use QR codes is to obtain a web link to find out more information about something or to get a password for a wireless network: scan the code and the information should appear in your web browser or connect you to the network. But how do you scan it? All you need is the right app.
    scanapphero
    Scanning the code is automatic: just line it up inside the guide lines. / © Scan, Inc.

    How to scan QR codes with an Android phone

    There are a few different Android apps for scanning QR codes, and QR Code Reader is one of our favorites: it’s both simple and free, it works quickly, and it doesn’t blast you with advertising (unlike many rival apps: one typical review of a rival says “pelts you non-stop with ads… way more advertising presented in a way more obtrusive way than is justified”).
    It’s also compatible with stacks of Android devices and versions: if you’ve got Android 2.3.3 or later you’re good to go - provided, of course, that your device has a camera. QR Code Reader is good, but it isn’t a miracle worker. If the code you’re scanning is designed to take you to a website, you’ll also need a data signal or wireless connection.
    QR Code Reader Install on Google Play To actually scan a QR Code, all you need to do is load the app, start scanning and point your camera at the QR code. Line it up inside the guide arrows and that’s it: QR Code Reader recognises it and provides the appropriate information, carries out the appropriate task or in the case of phone numbers and other contact information, asks you what action to take. It also records your scan history so you can see what codes you’ve been pointing your phone at.

    No ads, no money. What’s in it for the developers?

    They hope you’ll like the app so much you buy Scan, their $4.99 ($1.99 at the time of writing due to a limited-time sale). It has the same basic features as QR Code Reader but it also adds support for scanning all popular barcode types (UPC, EAN and ISBN) to show you pricing, reviews and anything else relevant to the product(s) you scan (although you’ll need a reasonably good camera for barcode scanning). Unlike QR Code Reader you can also set a default browser for opening web links; QR Code Reader opens them in its own browser.
    scanappsite
    You can make your own QR codes for free. / © Scan, Inc.

    Can I make my own QR codes?

    Yes! There are stacks and stacks of code-creating Android apps, although going through the reviews it seems like they all have flaws. It’s probably easier to go to the Scan developers’ website where you can create QR codes for social media, Wi-Fi access, contact information and many more kinds of data for free in your web browser.

    Are there any risks to scanning QR codes?

    Actually, yes. A scam known as “attagging” involves pasting new QR codes over existing ones, for example by pasting a label over the QR code on a poster. The new code could link to malicious software that might then access your camera or your personal data. In Russia, a QR code scam made phones send premium-rate texts at $6 per text. Such malware is very, very unusual, but it does exist and has done for several years.
    Do you use a QR code reader on your Android device? Is it a must-have app that delivers daily, or is it gathering virtual dust in your Apps screen? Have you ever been a victim of “attagging”? Let us know in the comments below.

    الاثنين، 25 ديسمبر 2017

    INFINIX LOLLIPOP UPGRADE for Hot Note and other - The Complete Guide

    Would you like to upgrade your Infinix Hot Note and Note Pro from Kitkat to Android Lollipop 5.0 OS? Today, I will be teaching you guys how to upgrade your device.
    We'll also talk about How you can perform the upgrades on your other various Infinix Models, like INFINIX HOT X507 and INFINIX ZERO 2, more on that later in this post.
    However, we should know that each of these Lollipop roms are uniquely different for each model.

    We already announced the Updates since August that Infinix Lollipop upgrades had been rolled out and already been on use but Beta versions were having few bugs which have been fixed in the recent ROM updates that we want to give you here now.


    Shall we begin? Lets go!

    Hi there! Today we'll show you how to Upgrade your Infinix HOT NOTE and NOTE PRO from KitKat to Android Lollipop 5.1 OS.

    We'll also talk about How you can perform the upgrades on your other various Infinix Models, like INFINIX HOT X507 and INFINIX ZERO 2, more on that later in this post.
    However, we should know that each of these Lollipop roms are uniquely different for each model.

    We already announced the Updates since August that Infinix Lollipop upgrades had been rolled out and already been on use but Beta versions were having few bugs which have been fixed in the recent ROM updates that we want to give you here now.


    Let's Begin:


    HOW TO UPGRADE INFINIX HOT NOTE TO LOLLIPOP

    REQUIREMENTS:
    i.) Your PC (running Windows 7 or 8)

    ii.) A working USB cable

    iii.) Infinix Hot Note X551 Lollipop ROM File >> Download Infinix Hot Note X551 Lollipop Here.
    OR Lollipop ROM file >> For Infinix Hot Note Pro (2GB+32GB version)

    Extract the file to a folder on your computer after downloading.

    iv.) VCOM Drivers, which you can DOWNLOAD HERE

    v.) SP Flashtool >> DOWNLOAD THAT HERE

    Install the softwares - i.) ii.) and iii.) above
    Once you have all those 5 tools ready, you can proceed.

    Hollup! just hollup, before we Continue...

    N.B: Upgrade/Flashing will Wipe your phone memory. Please Ensure you Back Up your device, especially Media files (Videos, Music) or whatever's important, back them up by moving the Files to your PC or remove the Memory SD card if you use one in your Infinix Hot Note.

    1. Be Sure your phone (Hot Note) is Still On and very well charged.

    2. Go to where you Extracted your SP Flash Tool v5.1352.01, inside it, you'll find the file name flash_tool.exe , right click and Run it as Administrator.
    For the first time, it will bring a Window saying - The Scatter file cannot found, please make sure the file is exist before download.
    Just ignore that by clicking OK.

    3. Click SCATTER LOADING, this opens your folder. Navigate into the folder where you had extracted the Lollipop ROM file for Infinix Hot Note X551.
    According to my screenshot, I saved my Rom in my Desktop.
    Select the scatter file with name - MT6592_Android_scatter.txt

    Wait till it completely loads up on the SP flash tool programs.

    4. On the SP Flashtool, where you see Download only, click and change it to FIRMWARE UPGRADE

    Use our Screenshot below for reference:

    SPFlashtool for Infinix Lollipop


    5. Click DOWNLOAD icon, then plug the USB cable to the PC and your phone, Now Power OFF your Device (Hot Note).
    Seconds later, some readings will display on the SP flash tool.

    6. Give it some time, Do NOT interrupt the process (well, unless you want to brick your device)

    7. When the Process is Complete and successful, You'll get a Check Mark in the Flashtool on your PC, now you can unplug your phone.

    Power ON the device, Keep calm as this will take a while since it's the first time.

    When it's finally On, Follow the Instructions on the Welcome message and we're done!
    Congrats, your Infinix Hot Note now runs Android Lollipop 5.1.

    Lollipop upgrade for INFINIX HOT X507 and INFINIX ZERO 2 X509

    This Detailed guide also works for upgrading INFINIX HOT X507 and INFINIX ZERO 2.
    All you Need to do is get the "Correct" Lollipop ROM for your Model, then come back here and follow this Complete guide On how to Apply the upgrade.

    More updates will be rolled out via OTA as you use the Lollipop OS fix bugs or improve user experience.

    DOWNLOAD LOLLIPOP 5.1 ROM >> FOR INFINIX INFINIX ZERO 2 X509

    DOWNLOAD LOLLIPOP 5.1 ROM >> FOR INFINIX HOT X507
     

    As a  matter of Fact, this Procedure is Quite Easy after all, and very similar to the One we used to Fix a Samsung Galaxy A3.

    Thumbs up to members of the Infinix BBS forum and one of our good friends, Samuel of TechsNG for their initial efforts in discussing this upgrade and fixing other issues on Infinix smartphones, you also can visit those guys if you have any issues with your Infinix device.

    Meanwhile, pls Drop your Comments Or Questions below, we'll be willing to help with Answers anyway we can.


    - See more at: http://www.editweaks.com/2015/09/infinix-lollipop-upgrade-for-hot-note.html#sthash.FsPA6NoA.dpuf

    HOW TO UPGRADE INFINIX HOT NOTE TO LOLLIPOP

    REQUIREMENTS:
    i.) Your PC (running Windows 7 or 8)

    ii.) A working USB cable

    iii.) Infinix Hot Note X551 Lollipop ROM File >> Download Infinix Hot Note X551 Lollipop Here.
    OR Lollipop ROM file >> For Infinix Hot Note Pro (2GB+32GB version)

    Extract the file to a folder on your computer after downloading.

    iv.) VCOM Drivers, which you can DOWNLOAD HERE

    v.) SP Flashtool >> DOWNLOAD THAT HERE

    Install the softwares - i.) ii.) and iii.) above
    Once you have all those 5 tools ready, you can proceed.

    Hollup! just hollup, before we Continue...

    N.B: Upgrade/Flashing will Wipe your phone memory. Please Ensure you Back Up your device, especially Media files (Videos, Music) or whatever's important, back them up by moving the Files to your PC or remove the Memory SD card if you use one in your Infinix Hot Note.

    1. Be Sure your phone (Hot Note) is Still On and very well charged.

    2. Go to where you Extracted your SP Flash Tool v5.1352.01, inside it, you'll find the file name flash_tool.exe , right click and Run it as Administrator.
    For the first time, it will bring a Window saying - The Scatter file cannot found, please make sure the file is exist before download.
    Just ignore that by clicking OK.

    3. Click SCATTER LOADING, this opens your folder. Navigate into the folder where you had extracted the Lollipop ROM file for Infinix Hot Note X551.
    According to my screenshot, I saved my Rom in my Desktop.
    Select the scatter file with name - MT6592_Android_scatter.txt

    Wait till it completely loads up on the SP flash tool programs.

    4. On the SP Flashtool, where you see Download only, click and change it to FIRMWARE UPGRADE

    Use our Screenshot below for reference:


    5. Click DOWNLOAD icon, then plug the USB cable to the PC and your phone, Now Power OFF your Device (Hot Note).
    Seconds later, some readings will display on the SP flash tool.

    6. Give it some time, Do NOT interrupt the process (well, unless you want to brick your device)

    7. When the Process is Complete and successful, You'll get a Check Mark in the Flashtool on your PC, now you can unplug your phone.

    Power ON the device, Keep calm as this will take a while since it's the first time.

    When it's finally On, Follow the Instructions on the Welcome message and we're done!
    Congrats, your Infinix Hot Note now runs Android Lollipop 5.1.

    Lollipop upgrade for INFINIX HOT X507 and INFINIX ZERO 2 X509

    This Detailed guide also works for upgrading INFINIX HOT X507 and INFINIX ZERO 2.
    All you Need to do is get the "Correct" Lollipop ROM for your Model, then come back here and follow this Complete guide On how to Apply the upgrade.

    More updates will be rolled out via OTA as you use the Lollipop OS fix bugs or improve user experience.

    DOWNLOAD LOLLIPOP 5.1 ROM >> FOR INFINIX INFINIX ZERO 2 X509

    DOWNLOAD LOLLIPOP 5.1 ROM >> FOR INFINIX HOT X507
     
    Meanwhile, pls Drop your Comments Or Questions below, we'll be willing to help with Answers anyway we can.

    الأحد، 24 ديسمبر 2017

    How to Flash GSmart Gigabyte Android Devices

    Gigabyte smartphones now commonly known as GSmart produces smartphones, tablets and Notes running either Android OS or Windows Mobile OS.
    In this tutorial, I will be discussing how to flash your GSmart ( Gigabyte ) android devices from the stock recovery. And later, when I complete my work on the Windows PC tool that can be used to flash and unbrick GSmart ( Gigabyte ) android device, I shall discuss that, too. So, stay tunned.

    Gigabyte GSmart Logo

    As common with every gadgets, there are times when these devices would develop faults, either software or hardware. Of course, you would need to service it. -that's exactly why this tutorial is here.

    WHAT IS FLASHING?

    Flashing is the process of reverting your device, in this case, Gigabyte/GSmart android device to its factory defaults by means of flashing STOCK GSmart/Gigabyte firmware on it. It can also be accomplished by means of flashing Custom ROM/Firmware on it.
    Flashing is done to correct any software malfunctions experienced on any Gigabyte/GSmart android devices. Even those that seem persistence after performing a Factory-Reset would be corrected by flashing the device.

    Unlike the MTK android devices, the procedures for flashing Gigabyte or GSmart android devices via the stock recovery is straight therefore, I would dive straight to the flashing exercise.
    Now, shall we proceed?

    1: DEFINITIONS OF TERMS USED
    Before we begin the flashing exercise, let us do a bit of introduction by introducing ourselves to the terms to be identified while flashing GSmart android device.
    • OS VERSION: this refers to the version of the firmware for which you have and that that you are going to use to flash the GSmart android device.
    • MODEL VARIANTS: usually, there are different variant(s) of some GSmart android devices, most commonly, CZech and Asia variants.
    • FIRMWARE: GSmart Gigabyte firmware is usually compressed and packed in a compressed zip file. This file, when flashed on GSmart android devices, contains all the images, GUI and the entire files necessary to run android OS on your GSmart android device.
    Flashing can upgrade or downgrade your GSmart android device. It all depends on the versions of the firmware you used while flashing the phone.
    Helpful Link:
    You can download GSmart Gigabyte Android Firmware From Here: GSmart Gigabyte Stock Firmware Download Links

    HOW TO FLASH Gigabyte GSmart ANDROID DEVICE FROM STOCK RECOVERY


    1: Download the specific firmware for the GSmart Gigabyte android device from the link above.

    2: Decompress or unzip the downloaded firmware on your PC or wherever you have downloaded it.

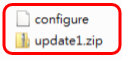
    3: In the folder wherein you have decompressed the downloaded firmware, you should see two (2) such as seen in the image below. Copy both of them to the root of your SD Card.

    Gigabyte GSmart Stock ROM Structure

    4. Slot/Insert the SD Card in the phone and then, Power Off the phone.

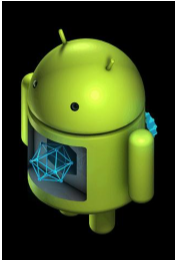
    5: Press and Hold the Vol + key while the Power Button is pressed then, release the Vol + as soon as the android icon appears on the phone screen.

    Gigabyte GSmart Android iCon

    6: Now, the phone should automatically detect the loaded firmware. Follow the prompt and let the flashing operation begin.

    Gigabyte GSmart Flashing

    DO NOT interrupt the flashing operation until it is completed!

    7: As soon as the flashing operation is complete, GSmart logo will appear on the phone and reboot.

    CONGRATULATIONS! You have now successfully flashed your GSmart Gigabyte android device.

    All thanks to ArykTech for providing us with this guide.

    السبت، 23 ديسمبر 2017

    Install Android Applications On Windows Phone: How to

    If you are a Windows phone user but fancies android applications and would like to have android applications installed on your Windows phone, the chance is, if you are having one of the Windows phones listed below; you can have android applications downloaded and installed on your Windows phone directly from the Play Store.

    The list of currently supported Windows Lumia phones that can install android applications include the followings;
    •Nokia Lumia 920
    •Nokia Lumia 925
    •Nokia Lumia 929 (icon)
    •Nokia Lumia 830
    •Nokia Lumia 930
    •Nokia Lumia 1520
    •Nokia Lumia 635 (1GB RAM variant)
    •Nokia Lumia 730
    •Nokia Lumia 820
    •Nokia Lumia 435
    •Nokia Lumia 928

    INSTALLING ANDROID APPLICATIONS ON WINDOWS LUMIA PHONE

    The process for installing Android apps on your Windows phone is simple however, you have to note these points before you proceed;
    1- Note that you are doing it at your own risk because I won’t be held responsible if anything happen to your device.
    2- Do not disconnect the device while an apk is installing.
    3- Do not reboot while your phone has Developer Mode Activated.

    Now, you may proceed installing android applications on your Windows phone following the guides highlighted below:

    Step 1Download APKtoWind10 from here. APKtoWind10 is a Windows PC program designed for managing Windows phone applications.

    Step 2- APKtoWind10 is compressed in a compressed file. Extract it in using WinRAR, WinZIP or 7zip. Once successfully extracted, install it on your PC and then, Lunch the program.

    Step 3- Drag your Android apk file you wish to install on the PC inside the step 3 box and hit the install button.
    You may download android applications from Mobomarket.
    Credit goes to SDRdaniel, original developer.

    If you have anymore questions, use the comment box below