الخميس، 28 ديسمبر 2017

How To Flash CMW Recovery On Gionee P2

 Image result for gionee p2
If you’ve ever thought about messing with your Android device, you’ve probably read that you need to flash a custom recovery onto it before you can do anything serious. But, you might want to ask a few questions like — what’s a recovery? What’s a custom recovery? What are my options for custom recoveries? We’re going to take a complete look at recoveries so that you can be well-informed when you start messing with your Android device.

What’s a Recovery?


The recovery, simply put, is a runtime environment (think “mini operating system”) separate from Android that can perform various system-related tasks. The stock recovery on most Android devices can apply OTA (over-the-air) updates, delete user and cache content (for factory reset purposes), and allow external tools from a microSD card to run functions on the device.
Compared to a full-sized PC, it is most similar to the BIOS in that it is a small piece of software that is independent of the operating system and can control various system settings and functions, but it does not actually perform the same exact tasks. For example, the recovery doesn’t control any I/O functions, which is entirely what the BIOS is about. The recovery also has no power as soon as Android is being loaded.

And a Custom Recovery?

cwm3_screenshot
A custom recovery is a non-stock recovery, which people can install over the stock recovery. There are many different reasons why someone will want to install a custom recovery — most of those reasons are extra functionality. Most of the major features include:
  • The ability for third-party ROMs to be installed over the stock Android image
  • The ability to perform Nandroid backups — these are very good backups that saves literally everything from your personal data to the operating system itself
  • The ability to communicate with the Android Debug Bridge, or adb, on a computer for debugging and other developer-type actions, which is otherwise only possible when enabling developer tools within Android
  • A more useful and/or visually-pleasing interface for the recovery, which can include touch capabilities or an interface not driven by menu options.
Long story short, custom recoveries allow you to do various things that the manufacturer may not want you to do with it. They make the stock recovery so limited for the sake of making sure that you don’t turn your device into a brick, but you know what you’re doing, right?
 #CMW Recovery for Gionee P2.....Download it here

After you download it put it on root of sdcard.
Install Mobileuncle MTK Tools from link here:
https://play.google.com/store/apps/details?id=com.mobileuncle.toolbox
Enter into MobileUncle Tools and Click on “Recovery update“.
Screenshot_2015-02-22-10-19-39-198
Now choose recovery image you download earlier (in this case recovery_ok.img, use either CWM or TWRP).
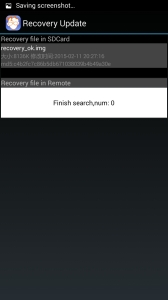
Screenshot_2015-02-22-10-19-45-317
Choose OK after dialog “Are sure flash recovery!”.
Screenshot_2015-02-22-10-20-00-483
Reboot directly into recovery if you wish.
Screenshot_2015-02-22-10-20-06-555
That’s all!
If you want to enter recovery from power off do this:
  1. Turn off the phone, uncheck quick boot mode.
  2. Press Volume +, Volume – and Power, all three at the same time and hold them until you see recovery screen.
 
     Click here to SUBSCRIBE to this Blog to Receive future updates..

    Get MIUI 7 for INFINIX HOT 507- 100% Sucessfully Ported and Bugless

    After very many, many hours trying to perfect this ROM and clean out all bugs, I am proud to present to you MIUI 7 [5.9.17 – latest] for the Infinix X507. This particular one, has not been easy but I finally made it.


    MIUI is still on Android KitKat OS so this is for those of you yet to upgrade to the lollipop firmware or you just love MIUI so much, like I do, enough to want to go back to KitKat for it.

    I will present you with download link for the ROM. The download is a RAR file which in it, contains the ROM in zip form, the recovery you will be using, [PhilZ Recovery] [You can flash the recovery using either MTK Mobile Uncle Tools or SP Flash Tool, whichever you prefer] and a folder containing Next Launcher and the theme I am using just in case any of you want to use my exact theme. Both my Next Launcher and theme are Premium already paid for apps so you need not worry about ads and the likes.


    I repeat, the ROM is bug free but if you encounter any bug, please let me know and I will work at fixing it ASAP.


    1. Both SIM Cards working and both have 3G

    2. Camera in perfect condition.

    3. Battery life optimum.

    4. No lags whatsoever.

    5. Fully deodexed.

    6. RAM usage low.

    7. Playstore working [plus it comes with MIUI’s App Store]

    8. SIM Toolkit working for both SIMs


    How To Install

    - Download the ROM from the following link MIUI_v7_5.9.17_Infinix_X507

    1. Make a backup of your contacts to a vCard and have it somewhere external like your sdcard or pc.

    You will import the vCard after you are done. You can use this app Contacts VCF.

    2. Copy the downloaded files to your sdcard

    3. Flash the recovery provided with the file. [You might get errors if you try to flash it with CWM or TWRP]

    4. Boot into your recovery

    5. Go to Backup and Restore and hit Backup to /sdcard

    6. Go back and into Wipe and Format Options, scroll down to Clean to Install a New ROM and select that

    7. When it’s done, select Install Zip and then choose zip and you can flash the zip you placed in your sdcard.

    8. After it’s done and tells you script was successful, go back and go into Wipe and Format Options again but this time, select Wipe Cache

    After that's done, select Wipe Dalvik/ART Cache

    9. Reboot your Infinix HOT.


    CONGRATULATIONS: You are now running the latest MIUI on your INFINIX HOT!


    NOTE: This is a ported ROM hence is unofficial. If you ever get a notification for an update, DON'T USE THE OTA update. It will get you Redmi Note 3G’s ROM [which is the base ROM of this port] and that will brick your phone if you do.

    Again, if you encounter any problems or have any questions, don't hesitate to ask.
    Click here to SUBSCRIBE to this Blog to Receive future updates..


    الأربعاء، 27 ديسمبر 2017

    Method to Root New Infinix Zero 3 X552

    The much awaited Infinix Zero 3 is now available for sale!. The Infinix Zero 3 was launched late last year and it comes with amazing features, it looks like a pretty great device. Zero 3 body-design is immense classic and premium, it comes with a dual-sided explosion-proof glass and stainless steel frame. The front is found to come with glossy piano paint while the back features meticulously brushed metal.  

    If you are in need of Infinix Zero 3 X552, it's now available for grab in Jumia Stock with the price of N53,000, rush in and get yours before it out of their stock.
    Grab it with the Buy Now button Below


    Buy from Jumia
    N53,000
    Infinix Zero 3 X552 16GB - Anthracite Grey 

    Below is the rooting method waiting for your Infinix Zero 3 and I'm pretty sure that you will like to root it probably because you will like to enjoy your phone to the fullest.


    Materials Needed For Rooting
    » PC with internet connection
    » USB Cable
    » SP Flash Tool - Download it Here
    » SuperSU.zip - Download it Here 
    » Download Ported TWRP by Team Hovatek For Infinix Zero 3 X552 - Download it Here

    To Root Infinix Zero 3 X552 
    » Save the SuperSU.zip that you downloaded to your phone's SD card
    » Unzip the TWRP for Infinix Zero 3 .zip file that you downloaded and flash the recovery image to the phone using SP Flash Tool
    How Can I Flash it Using SP Flashtool? Check out this link for the instruction: www.shoutamloud/2015/09/how-to-flash...

    » Now, boot your phone into TWRP Recovery Mode (by Holding the Vol Up and Power button simultaneously for 5 seconds)
    » In TWRP Recovery, Choose install zip from SD card - to choose a zip from SD card use Vol up and down scroll up and down, then choose the Supersu.zip file from the root of your SD card.
    Scroll to yes and install, after a successful flashing go back and reboot.

    It is simple as that. You may download Root Checker from Play Store to verify your root privileges. After downloading, simply Install Root Checker, run it and you should get a success message after then.

    Important Notice
    After rooting your phone, it’s advisable to unroot before performing an OTA update or restoring factoring settings.
    Also note that this is the available method for it now, we will update you as soon as we get another simple method. 

    All Credit goes to Team Hovatek.

    It Happens Again!! MTNMagic Sim Is Out

    More that a month now must of our Facebook fans turn their MTN sim to magic sim
    and they are enjoying unlimited browsing
    without using any vpn both on Pc and Mobile
    device. For those that are not new to free
    browsing stuffs, the name magic sim is well
    known because some years back we make a
    lot of money with it and we enjoy super fast
    internet speed with MTN magic sim which last
    for more than 8months. Today i successfully active my own Magic
    Sim and i device to share it to all my readers
    who are ready to enjoy magic sim or want to
    make money with it.
    But i not will not post it here because due to
    some reasons
    Kindly visit our facebook page now and grab
    the steps to follow to activate MTN magic
    sim and enjoy unlimited free browsing at the
    moment
    Today i successfully active my own Magic
    Sim and i device to share it to all my readers
    who are ready to enjoy magic sim or want to make money with it.
    But i not will not post it here because due to
    some reasons
    Kindly visit our facebook page now and grab
    the steps to follow to activate MTN magic
    sim and enjoy unlimited free browsing at the
    moment
    Click to goto olasstech facebook page
    now
    OR
    Drop your whatsapp number via comment box

    الثلاثاء، 26 ديسمبر 2017

    [CUSTOM ROM] Melting Rocks III for Tecno A+ and A2

    This is yet another Samsung ported ROM for  Tecno F7. This Rom has many features, some of which are listed below:
    Without too much talk, I give you version III. Remember, I am irresponsible for any damage this might cause to your device. Do make sure you back up your present ROM before proceeding with this process.
    This is an OS update so for all intents an purposes it would be like stock Samsung.

    1) Download Melting Rocks III.zip File Here for A+ and here for A2
    2) Put into External/Internal SD Card
    3) Go To CMW Recovery
    4) Wipe Data
    5) Take a deep breath
    6) Wipe System
    7) Wipe Dalvik Cache
    8) Select Install From SD (Internal or External)
    9) Select Melting Rocks.zip And Select YES
    10) select OK

    11) Reboot Your System
    12) Enjoy


    NEED FURTHER ASSISTANCE? Contact us via whatsapp:08106847913

    Simple Server and Psiphon full configurations for MTN and ETISALAT Unlimited Free Browsing

    Are you still paying the ISP's before you can browse? Com'on stop that shit, you don't need to while others are enjoying unlimited browsing always. Did you know that you can stay online browsing for 24hrs without paying anything? If NO then this post belong to you. I am going to give you full configuration on how to browse free both on PC an Android device without paying anything. This is what we have been using for more than 6 Months now and is still working perfectly.

    With Simple server you can browse and download with 0.0kobo with MTN using our MTN Simple server on PC and Android.
    With simple server to browse and download With N70 and you can download over 4.5gb files with it.
    Without long story you can configure yours now and start enjoying Unlimited browsing. Below are the configuration and the link where you can download the software for unlimited browsing

    FOR SIMPLE SERVER


    MTN  Bblited With simple server for android
     Dial *216*7# or Send BBLITED to 21600
    Then configure it as follows
    Mobile settings
    Apn: web.gprs.mtnnigeria.net
    ip: 127.0.0.1
    port: 8080
    Under:-
    Listen port = 8080
    Mark enable proxy box
    proxy host = 10.199.212.2
    proxy port = 8080
    Enable injection box
    Injection method = get
    Injection query/url = http://web.blackberry.com
    Injection host = web.blackberry.com
    Injection line = press enter 4 times
    buffer size = 8092
    log level = debug
     

    MTN Bblited with simple server for PC
    LHOST = '127.0.0.1'
    IMETHOD = 0
    ISPLIT = 0
    RHTTP = 0
    TIMEOUT = 60
    PHOST = '010.199.212.002'
    RQUERY = ''
    RPATH = 0
    PTYPE = 0
    KEEP = ''
    BQUERY = ''
    MQUERY = ''
    RHTTPS = 1
    PPORT = 8080
    LPORT = 8080
    VALHDR0 = 'web.blackberry.com'
    VALHDR1 = ''
    VALHDR2 = ''
    VALHDR3 = ''
    IQUERY = 'web.blackberry.com'
    ADMODE = 0
    CQUERY = ''
    CUSHDR2 = ''
    CUSHDR3 = ''
    CUSHDR0 = 'Host'
    CUSHDR1 = ''
    ILINE = 0
    FQUERY = ''
    SBUFF = 1024
    RPORT = 0
    MTN Unlimited with Simple server for android
    Mobile settings
    Apn: web.gprs.mtnnigeria.net
    ip: 127.0.0.1
    port: 8080
    Then configure it as follows
    Under:-
    Listen port = 8080
    Mark enable proxy box
    proxy host = 10.199.212.2
    proxy port = 8080
    Enable injection box
    Injection method = get
    Injection query/url = http://server4.operamini.com
    Injection host = server4.operamini.com
    Injection line = press enter 4 times
    buffer size = 8092
    log level = debug


    MTN Unlimited with simple server for pc
    LHOST = '127.0.0.1'
    IMETHOD = 0
    ISPLIT = 0
    RHTTP = 0
    TIMEOUT = 60
    PHOST = '010.199.212.002'
    RQUERY = ''
    RPATH = 0
    PTYPE = 0
    KEEP = ''
    BQUERY = ''
    MQUERY = ''
    RHTTPS = 1
    PPORT = 8080
    LPORT = 8080
    VALHDR0 = 'server4.operamini.com'
    VALHDR1 = ''
    VALHDR2 = ''
    VALHDR3 = ''
    IQUERY = ''server4.operamini.com'
    ADMODE = 0
    CQUERY = ''
    CUSHDR2 = ''
    CUSHDR3 = ''
    CUSHDR0 = 'Host'
    CUSHDR1 = ''
    ILINE = 0
    FQUERY = ''
    SBUFF = 1024
    RPORT = 0

    Etisalat unlimited Simpleserver for Mobile
    Mobile settings
    Apn: etisalat
    ip: 127.0.0.1
    port: 8080
    open ur simple server setting
    proxy host:185.28.193.95
    port:8080
    injection query/url:http://mobile.facebook.com
    injection host:mobile.facebook.com
    injection line : press enter key four time
    log level: debug
    open and minimize your simple server and connect,you can use auto proxy to make all aplication work.
     FOR PSIPHON VPN
    MTN Unlimited with Psiphon
    Under Proxy type select  ''real host''
    Under Proxy server: server4.operamini.com
    Under Real proxy server: server4.operamini.com
    Then leave the others and save.
    You will get a pop up message asking if you want to use psiphon browser only or Tunnel whole device. Make sure you choose tunnel whole device
    Then it will take you to the next screen, click on the option tab.
    Under region select USA server, then click on more option.
    Then click on more option. Under “proxy settings”’ check the “connect through an HTTP Proxy” box.
    Then press the back button and wait for a few secs while is connecting.


    ETISALAT WITH PSIPHON
    Mobile settings
    Apn: etisalat
    leave ip and port empty
    open ur psiphon handler
    tick remove port
    proxy type:select real host
    proxy server:mobile.facebook.com
    click save.
    Go to option and select region as united state.
    tick tunnel whole device.
    Enter more option and also tick “connect through http”
    still on more option tick “use the following setting”
    Host adress:185.28.193.95
    port:8080
    close and connect
    Now click HERE to Download and Install Psiphon Handler

    PSIPHON ON PC IS COMING SOON 
    You can download Psiphon software for Pc HERE 
    NEED FURTHER ASSISTANCE? Whatsapp us:08106847913
     

    Sure Five Working OpenVpn Configuration Files For Etisalat Social Me/Chat Pak..

    ShoutAmLoud is here again....Sicerely speakingsSince the arrival of Magic IP I can't remember when last I did subscription for Etisalat social pak, but I notice that some users are still subscribing for social me and openvpn users are requesting for configuration files for openvpn connect. Now i have Five (5) working config files for etisalat social/chat pak for Openvpn lovers so that they can keep on rocking as usual.


    Kindly click the links below to download Etisalat Openvpn config file for Social me/chat pak sub.


    Link 1


    Link 2


    Link 3


    Link 4


    Link 5


    For those that use psiphon vpn you can use the IP's below too

    5.196.12.152 8080

    91.196.230.66 3128

    51.255.192.42 3128

    151.236.56.190 3128

    123.176.37.106 3128

    Visit HERE to check our proxy server page for NEW Openvpn Password.
    NEED FURTHER ASSISTANCE? Comment below or reach us Via Whatsapp:+2348106847913